How to display IDX widgets dynamically
The dsIDXPress WordPress IDX plugin is hands-down the best MLS search solution for a WordPress real estate website. If all you use are the numerous pre-configured widgets for displaying property search, maps and other property information in your WordPress sidebars, it’s quite powerful – but there’s so much more you can do with settings that display certain areas, cities, price ranges, property types, and other segments of your market with each IDX widget.
Hyper-local, community specific information will ensure visitors engage with your content. Specific information and posts/pages that are highly relevant to segments like property type (residential, single family, condo, etc.), price ranges, specific cities or market areas, and other factors that make one neighborhood or property type very different from another all play a role in getting visitors to stay on your site longer. To enhance their experience even more, tailor the sidebar of each page with custom IDX widgets that display filtered properties and search results directly relevant to the content of each page.
These instructions require the use of the dsIDXpress IDX plugin for WordPress. If you don’t already have dsIDXpress, click to download and install the dsIDXpress IDX plugin on your site, then contact us to purchase an activation key to get access to homes in your local MLS feed data.
Here’s how to combine the dsIDXpress IDX plugin and the Dynamic Widgets plugin to display custom MLS search widgets on different pages of your real estate site:
Install the Dynamic Widgets Plugin
- To start, locate the Add New link under the Plugins menu in your WordPress admin.

- From the Add New page, perform a search for “dynamic widgets” and just click Install when you find the Dynamic Widgets plugin.

- Once the plugin has installed, click to Activate it, then it’s then ready to use.
Build a custom-filtered IDX widget
To best understand how to use these plugins together, we’ll use this scenario:
Anytime your site talks about skiing, you want to display widgets in your sidebar specific to that audience. Home buyers reading about skiing in your market will want to look at real estate in the ski valley, a small condensed area of the mountains; and most of the homes available in that area are condos.
The solution? Create a widget that will only display homes in the zip code that covers the ski valley (zip code: 87525), plots those listings on a map – and will only display on pages or posts we’ve categorized in the Category: Ski Valley.
To start, we’ll create our customized IDX widget using dsIDXpress.
- First, go to the Widgets page found under the Appearance menu of your WordPress admin.

- Locate the IDX Listings widget item from your list of available widgets and drag and drop it into the sidebar on the right side of the page.
- Now we’ll customize our new widget. To start, provide a Widget title. Visitors will see this title at the top of your widget, so use something descriptive and attention grabbing, if possible. In this example, we’ll use “Taos Ski Valley Newest Listings” as our title.
- Next we’ll need to set the # of listings to show value. This determines how many properties will display in the widget at any given time. Since we’re going to use a map, the more properties we show, the more crowded the map will be – so we’ll set this value to just “25” listings.
- The next setting determines how the properties will be displayed by default. Visitors will be able to toggle between the various views, but we can set the way the widget will display listings when it initially loads. Because our skiing area is pretty limited in size, we’ll use the “Show on map by default” setting.
- Next we’ll choose the “Pick an area” option so we can filter listings based on a zip code.
- Choose “Zip Code” from the Area Type dropdown menu, then enter our ski area zip code of 87525. (You may want to use a real zip code for your area).
- You can leave the other settings as-is, then click Save. Your form should look like the image below.
 As you can see there were plenty of ways in which we could limit or expand the listings we want to show, including only showing agent or office listings.

Now that we’ve created our customized IDX plugin for homes the ski area, we’ll need to use Dynamic Widgets to display the widget only on certain pages.
Use Dynamic Widgets to Display Selectively
Now it’s time to set up this widget to only display on the pages and posts where there is content relevant to the ski valley. You’ll also see other ways in which you can instruct the widget through options to display based on a number of criteria.
 First, here’s the bottom half of the widget we saw before with the link we need shown by the arrow. Default for the new widget is “Static,” meaning it will show on every page or post with the sidebar, which is default for WordPress.
Always when creating a new widget click the “Save” button before you move on to setting Dynamic Widget options. This sets it to the Static default so you’re working with a clean slate for your options.
When you click on the “Static” link, you’re going to be presented with your options screen where you can precisely designate on which pages/posts you want this widget to appear.
The Quick settings box is your first option change. The link “Set all options to ‘No” is a setting you’ll normally want to make. Remember that “Static” displays the widget everywhere. Clicking this link removes the widget from everywhere, meaning it will not display at all. So, we would click that link and we’re starting with a clean slate to tell Dynamic Widgets where it can display this widget.
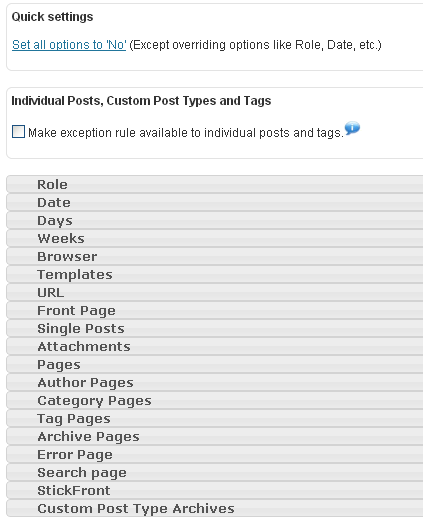
There are a number of tabs, each giving us an option to set for where we want our IDX search widget to display. For now, let’s just look at the two options used the most by real estate agents; Single Posts and Pages.
Single Posts: Display Posts in Specified Category
We’ll be writing a lot of content in the form of blog posts about the ski area or ski valley, and we may even have some written by guest authors. So, we’re posting and assigning the Category “Ski Valley” to any post that mentions it or skiing, or even restaurants and events in the Ski Valley. Here are the steps to have our IDX Listings show in the sidebar only next to posts in the Ski Valley category.
Remember that we’ve clicked on the “Set all options to No” link, so right now our widget will not display anywhere. Click on the Single Posts option to get the box shown here:
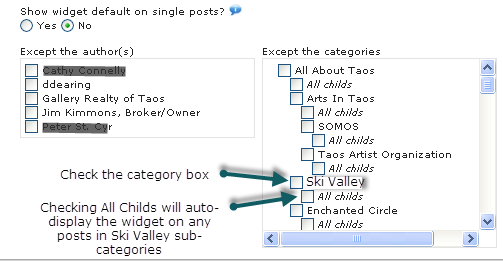
We’re going to ignore the “Except the Author(s) box to the left, as we’re not concerned with authors here. All we have to do is to check the category Ski Valley. If we later have sub-categories under this one, such as Ski Valley Lodging, etc., we would also check the All Childs box. If we create sub-categories and post to them later, they’ll automatically have our IDX Listings widget displayed.
Pages: Display Static Pages by Selecting the Page(s)
Because the Ski Valley is important to the local economy and the real estate industry here, we feature a lot of information on the site about it, including pages dedicated to it.
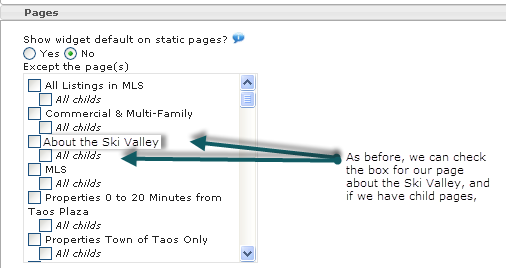
All we have to do in order to display our widget here as well is to check off the appropriate boxes. Now when our site visitor interested in Ski Valley condos is at the site, anywhere they arrive or go that has content related to the ski valley will offer them the IDXPress Listings box at the top of the right sidebar, a prominent lure to get them to check out listings.
What about all of those other options?
There are really only three of the other settings options used frequently on real estate WordPress sites.
- Front Page (home page) – this is very useful if you only want a widget to show on the home page. One use is to place an IDXPress search widget for the entire MLS on the home page. Then on other pages where we’re talking about specific areas or neighborhoods, the listings displayed in the sidebar can be only for the area discussed on that neighborhood page.
- Category Pages – WordPress creates a category page when requested that shows all of the blog posts in that category from newest to oldest. So, you’ll also want to specify that our Ski Valley listings widget display on the category page.
- Tag Pages – If you use tags, and especially if you use a “tag cloud,” you may want to specify certain widgets to show up when a certain tag is selected. An example would be posts with the tag “transaction.” You will be writing posts about the transaction process from contract to closing. For every post you tag “transaction,” you may want a widget offering a free report with the process in detail. Of course, they must give you their name and email address to get it … LEAD!
This is probably the most valuable plugin besides your dsIDXPress plugin that you can install at your WordPress IDX site. It gives you total flexibility to tailor offers, special reports, or IDX search and listings boxes to specifically display only when they’re relevant to the content of the page. “Stickiness,” that elusive quality that keeps visitors on your site and moving through your content is going to improve. And, you’ll find that you will generate more leads when you display special offers or reports next to content that is relevant.